Repairing a laptop charger can vary in complexity depending on the specific issue. Some problems can be easily fixed, while others might require more technical expertise. Here’s a general guide on troubleshooting and potentially repairing a laptop charger:
Important Note: Before attempting any repairs, ensure your safety by unplugging the charger from the power source and your laptop. If you’re uncomfortable or unsure about any step, it’s best to consult a professional technician.
- Visual Inspection:
- Examine the charger cable and connectors for any visible damage, such as frayed wires, bent pins, or loose connections.
- Check the power brick (the larger component in the middle of the cable) for any signs of overheating, melting, or unusual odors.
- Test with a Multimeter:
- If you have access to a multimeter, you can test the charger’s output voltage. Compare it to the voltage specified on the charger label (usually around 19V for most laptops).
- Connect the multimeter’s positive probe (red) to the inner pin of the charger connector and the negative probe (black) to the outer part of the connector. Be careful not to short-circuit the connector.
- Test with a Known Good Charger:
- If you have a similar charger that you know is working, try using it with your laptop. If it charges your laptop, the issue is likely with the original charger.
- Replace the Cable:
- If the cable is damaged, you might be able to replace it. You can purchase replacement cables online or from electronics stores.
- Cut off the damaged portion of the cable and strip the wires to reveal the inner conductors. Then, solder or connect the wires securely.
- Check the Connector:
- If the connector is loose or bent, you might be able to carefully bend it back into place using small pliers. However, this requires precision to avoid causing further damage.
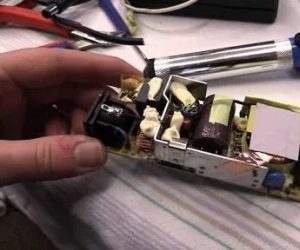
- Repairing Power Brick:
- If the power brick is the issue, it’s often best to replace it, as opening it up and attempting repairs can be risky and may void any warranty.
- Professional Repair:
- If the issue is beyond your expertise, or if the charger has more complex internal problems, it’s best to consult a professional technician or the laptop manufacturer’s service center for assistance.
- Prevention:
- To prevent future charger issues, handle your charger with care, avoid bending the cable excessively, and unplug it by gripping the plug rather than pulling on the cable.
Popular feature

Charger Repair Component Level.
To find the bad component and replace it with new parts. Check the proper voltage if working well repack.
Process breakdown
- Trace.
- Track.
- Replace.
- Repack.
- Check after repairing that all working well.

We accept your gadget
Laptop parts chip level repair one-stop solution.

Diagnose and repair
Replace the damaged or bad component.

You pick up your gadget
After repair, we check your gadget for a few hrs and contact with the customer.
Remember, safety is paramount when dealing with electronics. If you’re unsure or uncomfortable with any step, seek professional help to avoid causing further damage or risking personal injury.


